Sunday, September 25, 2011

Another 0.4 " of rain ... to the detriment of the fava beans?

The tips of some of the fava bean leaves are turning black again.  Probably too much water.  After the drought this summer that hardly seems possible.

Some of the plants are blooming.  I certainly did not expect that so soon, but it turns out to be normal.  Plants started in the fall will bloom through cold weather, then produce fruit in the spring.  The flowers are lovely to look at, and fragrant, to boot!  I read that when one breaks open a bean pod it releases the same fragrance.  And guess what?  The foliage is also edible ... supposedly a nice addition to a mixed green salad.

Friday, September 23, 2011

First Day of Autumn

I don't like transition times in the garden. I mourn the end of tomato season. I long for one more fresh, crisp cucumber. I hate the sparseness of the bean plants as their leaves turn yellow and brown and fall to the ground.  I'm reluctant to clear out the old to make way for the new, so I allow tired plants to stay, coaxing out every last bit of vegetable goodness.

But Mother Nature and Father Time always win. Summer ends. Daylight dwindles. The autumnal equinox arrives. And with it ... a new crop to bring to the table! While the beans, peppers, and okra will likely produce until frost, the menu is about to change. Even as I drag my feet, the cool weather garden is taking shape.

The lettuce, spinach, and kale seeds have sprouted. The arugula is looking healthy and ready to cut. The broccoli, cabbage, and collards are growing well. The butternut squash (planted late) is plagued with a few squash bugs, but I'm hoping for a good harvest before insect damage takes its toll. The fava beans are doing their job as a cover crop. They will be ready to harvest in late winter / early spring.

So I will enjoy the trickle of cherry tomatoes and rejoice in the encore performance of the pink-eyed purple-hulled peas as I pile arugula on my sandwich and look forward to that first pot of collard greens!

Another 1/2-inch of rain ...

It's wet out there!

Thursday, September 22, 2011

2.8 Inches of Rain Overnight

Temps in the mid 70's.
Humidity in the low 80's.
It's damp out there!

Monday, September 19, 2011

Weed-Free, Neat, and Tidy

Noah has been here since last Wednesday night.  We've enjoyed a nice visit and have gotten some work out of him, too!  He's been busy mowing, broadcasting grass seed and fertilizer, helping Rouse run wiring in the workshop, etc.  In between the chores, we did manage to get in that lesson on making okra pickles!

The number one item on my garden to-do list was to put down a layer of cardboard, then heavily mulch the pathways between the raised beds.  This very effectively controls weeds, cuts down on messy mud, and makes for an overall neat and tidy garden space.  It's a job that requires a lot of manual labor.  Three loads of mulch had to be purchased, picked up, and hauled home in the bed of the pickup,  then transferred to the wheelbarrow and spread throughout the garden.  I was happy to pass that off to Noah.  He did a great job.  Rouse says the garden is currently the most attractive place in our landscape!

Hericium in the chicken yard


We have an interesting and uncommon fungus growing naturally in our chicken yard on an old dead and down tree. One of its many common names is "lion's mane", otherwise known as hericium erinaceus. This is a highly prized edible mushroom. In fact, it has been described as one of America's best, safest edible mushrooms. Some folks describe its texture and taste as reminiscent of seafood. I think it tastes like whatever you cook it in!

Hericium is one of the 'tooth fungi' and is easily identified by its drooping spines, or teeth, which hang like little icicles. Many different types of mushrooms have teeth instead of a cap, but lion's mane and other members of the Hericium genus are some of the most recognizable. The purpose of these teeth is to manufacture and release spores, the "seeds" of a mushroom that allow the fungal organism to reproduce. Our hericium has shown up every year since we built the chicken yard. Of course, it may have been there before. We just didn't notice it!

We have several clumps growing on the log this year. Surprisingly, the chickens don't seem to mess with them, but these wild mushrooms do tend to harbor bugs, dirt, and bits of tree bark in their teeth. They're just about impossible to wash. For best results, pick them when they're fresh, i.e. still growing, and visibly clean.  Plan to eat them right away. Otherwise, you risk the disappointment of a tough and bitter tasting 'shroom.

Hericium is rich in protein, riboflavin, niacin, peptides, polysaccharides, and vitamins. So how do you eat it? Use it in your favorite mushroom recipe. It makes a great meat substitute for a vegetarian meal.  I searched for a recipe online to get inspired, tweaked it a bit to make it my own, and ended up with a thick stroganoff-like sauce that I served with crackers as an appetizer at Sunday dinner. It was a hit! Thinned down, it would make a delicious topping for pasta.

Lion's Mane Stroganoff
1/2 pound lion's mane mushroom, cleaned and thinly sliced
2 tablespoon olive oil (divided)
2 tablespoons butter (divided)
2 cups light cream (or combo cream / milk)
1/2 cup onion, chopped
2 cloves garlic, chopped
2 tablespoons arrow root starch (may use flour or other thickener)
salt and freshly ground black pepper, to taste
1/4 cup sour cream
1/4 cup parmesan cheese, freshly grated

Clean the mushrooms carefully; slice them thinly. Melt one tablespoon each of olive oil and butter in a skillet over medium-high heat.


Add the mushrooms. Saute until they have given off most of their liquid and are golden brown. Do not overcrowd the pan!  It will cause the mushrooms to steam rather than fry. Reduce the heat to medium-low if mushrooms are browning too quickly. Remove from the pan.


. Melt remaining one tablespoon each olive oil and butter. Add the onions and garlic to the pan. Cook until the onions are soft. Return the mushrooms to the skillet.

Add the arrowroot starch (or other thickener), salt and pepper. Cook several more minutes, stirring frequently.

Slowly pour in the cream, stirring continuously. Turn down the heat and allow the mixture to simmer until it has reached desired consistency. Add sour cream and parmesan cheese. Adjust the seasonings. I like lots of black pepper.

Finished product. Serve on top of pasta, rice, or crackers.

Want more information about these mushrooms?
Check out these links:

Sunday, September 18, 2011

Dominique Hen

Pushing Back the Woods

The corner near the entrance to the chicken yard had turned into a jungle! A jumbled collection of sugarberry trees - top heavy with grape vines and surrounded by greenbriar - was shading out our young fig tree. Rouse and Noah worked together to cut it back.

But the vines were working against the guys, holding the trees up.  Noah climbed, clippers in hand, and released the vines at critical points. After that, the trees came right down - next to the fig tree (not on top of it) just as planned!


I'm lucky - I count on Rouse and our boys to do chopping and heavy chores. I don't "do" chainsaws or climb trees!

The wild grapes were plentiful!  The vines were thick and had totally covered the tops of the trees.  Now they were lying in a tangled heap upon the ground. Big bunches of tiny grapes were spread out in front of us. Of course Noah and I had to sample a few. The predominant taste was sour.  He suggested eating a mouthful at a time. When I did that - and used my imagination - I could almost make out a grape-y taste.  Almost.  I decided I didn't want to fool with trying to make jelly out of these wild grapes.  Later, I googled 'wild fox grapes', and found that people do make and enjoy wild grape jelly. Maybe cooking them down brings out the flavor?


Although I decided not to go the jelly route this time, the fox grapes were not wasted.  The chickens totally enjoyed them. Gather 'round, girls!


All clear, and the space feels very different ... spacious, open. The fig tree has good access to sunshine and plenty of room to grow. Bring on the figs!

Saturday, September 17, 2011

Bye Bye Bush Beans

The jade bush beans are finished. I pulled up the plants, loosened the soil, and sowed two varieties of kale in the newly empty space:
  • spring (or smooth) kale
  • red russian kale

Friday, September 16, 2011

Temperature Shift

57 degrees at wake-up this morning, with an expected high of 65 degrees for the day. The sky is overcast, the breeze has a definite feeling of fall, and there's rain in the forecast. It's a good day to plant lettuce and spinach!

I pulled up the cucumber plants, cut the basil way back, cleaned up the peppers and cherry tomato plants (can't bear to pull them up yet ... still enjoying their fruit), and prepared two patches of soil for two rows each of:
  • smooth leaf red cardinal spinach
  • savoyed leaf spargo spinach
  • black seeded green lettuce
  • mesclin salad mix

The brown mulched areas shown in this photo will soon be filled with tasty salad greens. As the basil, peppers, and tomatoes play out I'll replace them with more varieties of lettuce, spinach, arugula, etc. When the transition is complete, the entire bed ... as well as my salad bowl ... will be full!

After finishing the outside garden chores, I headed indoors where I transformed the mound of fresh basil into fragrant pesto - a lush version loaded with garlic, walnuts, and parmesan cheese for immediate use and a more basic version sans cheese and nuts for the freezer.

Our son, Noah, is visiting this weekend. I gave him the job of layering cardboard, then mulch, in the paths between the raised beds. It's an effective way to control weeds and I've got a lot of weeds to control! Later, at his request, we'll have a lesson in making okra pickles.

Thursday, September 15, 2011

Saturday, September 10, 2011

First Blue Egg

The Ameraucanas are coming of age. Today Rouse picked up our first blue egg!

We currently have 14 hens ... four young Ameraucanas, four young Dominiques, one second-season Dominique, and five fourth-season Dominiques. This afternoon there were a total of seven eggs in the nest. The one small blue egg belongs unquestionably to one of the Ameraucanas. The four small brown eggs indicate that all four of the young Dominiques are laying. One of the large brown eggs most likely belongs to the 18-month old hen who should continue to lay well this year.

The remaining egg belongs to one of the more mature hens, who have shown a definite decline in egg production this year. In fact, at this point I'm pretty much running a retirement home for my old girls!

Friday, September 9, 2011

Canned Green Beans

My first time canning green beans.  I feel strangely mature.

Before:
Rattlesnake pole beans on the left.
Asian long beans on the right. 

After:
Four quarts of pole beans.
Three pints of long beans.

I know where my green beans come from, by golly!

Thursday, September 8, 2011

New Toy

Here's a photo of my new 23-quart pressure canner. It's a hoss! I better put it to good use. Otherwise, those home canned goods will be expensive, indeed. Tonight ... green beans!

Okra Pickles

Okra Pickles
3 1/2 pounds small okra pods
1/3 cup canning salt
2 teaspoons dill seed
3 cups water
3 cups vinegar
4 cloves garlic
2 small hot red peppers, cut in half

Trim stems of okra, being careful not to cut pods; set aside. Combine salt, dill seed, water and vinegar in a large saucepot. Bring to a boil. Pack okra into hot jars, leaving 1/4-inch headspace. Put one clove garlic and one-half pepper in each jar. Ladle hot liquid over okra, leaving 1/4-inch headspace. Remove air bubbles. Adjust two-piece caps. Process 15 minutes in a boiling-water canner.

Gather supplies ... the recipe, ingredients, jars, lids and bands, pots, utensils, towels and pot holders.  Heat jars and lids in a large pot of simmering water. Mix up the pickling liquid in a pot on the stove. While waiting for it to come to a boil prepare the okra.

Fill the jars and process! I had two pounds of okra available this morning, enough to make four pints of pickles. Here the jars are filled and ready to be processed in the hot water bath.

Wednesday, September 7, 2011

Powerless Morning / Pepper-full Night

We had a few more raindrops from Hurricane Lee, 3/10-inch to be exact, but there was a price to pay.

We woke up in the middle of the night to no power. The moon had set.  There must've been heavy cloud cover. The house was pitch black. I got up to go to the bathroom and ended up in the closet! No worries, I made the correction in time.

Once morning had broken I called the power company. The customer service rep said that 827 clients were without power. Rouse had to shave at the office. I carried on with students in the morning. The power came back on 11:45am. But that wasn't the end of it!

Rouse called the house at midday. He couldn't get me on the land-line so he called my cell phone. It turns out the phone and related internet service were out in our area - a problem related to the same huge downed tree that took out the power lines down the road and around the corner on Old 87. The phone service resumed sometime around 6:00pm.

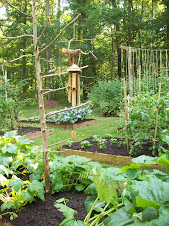
The UP side ... the garden is wet and happy. The brassica plants and the fava beans are growing well. The arugula needs to be thinned. The butternut squash is healthy and blooming - and I see tiny baby squash forming. The green beans are prolific. I have enough okra to make another batch of pickles tomorrow.  The cherry tomatoes are hanging in there and I'm still getting a few cucumbers. The peppers are plentiful.

In fact, I fixed a large pan of stuffed peppers for supper tonight. I made up two vegetarian fillings ... one potato based, the other rice based.  Do-again-ers!

Depending on the size of your peppers, the following recipes will each stuff about a dozen peppers.

Bring a large pot of salted water to a boil. While waiting for the pot to boil, wash and prepare peppers, removing seeds and membranes. (If you're using hot peppers, be sure to wear gloves and take care not to touch your eyes, mouth, or nose!) Lower peppers into the boiling water. Boil for 10 minutes. Remove from hot water, drain. If you're ready to stuff and the peppers are too hot to handle, you may rinse them with cool water, then drain.

Rice Stuffing for Assorted Peppers
1 tablespoon olive oil
1/2 cup onion, chopped
1/4 cup frozen peas
1/4 cup frozen corn
1/2 can red beans
1 cup prepared rice
1/2 cup salsa (I used my home-canned Fiesta Salsa)
3/4 cup Mexican cheese medley
Lizano Salsa (vegetable-based condiment, imported from Costa Rica)
salt / pepper

Potato Stuffing for Assorted Peppers
1 tablespoon olive oil
1/2 cup onion, chopped
1/4 cup frozen peas
1/4 cup frozen corn
1/2 can red beans
8 potatoes, peeled (optional), cubed, cooked
1/4 cup feta cheese, crumbled
1/4 cup cream cheese, softened
1/4 cup parmesan cheese, grated
buttermilk, enough to get desired consistency
salt / pepper
Meat Eaters' Variation:  Try adding crumbled bacon or diced ham.

Saute onion in oil until soft and transparent. Add peas, corn, and beans.
  • For Rice Variation:  Add rice, salsa, cheese, and seasonings to taste.
  • For Potato Variation:  Mash potatoes, adding cheeses and enough buttermilk to make the potatoes creamy, yet thick enough to mold into the peppers. Add salt and pepper to taste. Add meat if desired.
Stuff into prepared peppers.  Bake at 350 degrees until heated through. (Do not over bake. They'll dry out.)
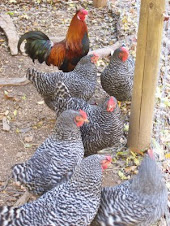
Tuesday, September 6, 2011

Remnants of Hurricane Lee

It was a dark and stormy morning. Then severe thunderstorms moved across the area mid- to late- afternoon, spawning tornadoes and dumping rain. No severe damage here, but the garden is happy to be wet. Things were getting a little brittle out there.

.7" rain early this morning.
.3" rain early this evening.

Monday, September 5, 2011

Dried Figs

I think I have enough fig preserves put aside for the coming year.  Now I'm putting my Nesco American Harvest food dehydrator to work drying the sweet fruit for future use.

The trick to making the best dried figs is to use fruit that's dead ripe. Once the fruit "droops" it may be picked, but leaving it for an extra day (or two?) allows it to fully ripen.  This fig has drooped, but it's still a little green at the stem end.

To wait is to take a chance that your prized fruit will become bird food, as seen in the photo to the right ...

... or bug food!  Leave it a little too long and it will start to mold.  Check out the fuzzies on the underside of this fruit, which has become a delicious treat for the ant but is no longer very useful to me.  It's a very fine line we gardeners walk!

Once the ripe figs are gathered, wash them gently in cool water, remove the stems, and cut each one in half. Lay them out on the dehydrator trays, skin side down. Set the temperature dial to 135 degrees and wait about a day. Do not over dry.

Figs are loaded with good nutrition and fiber, but they do contain a lot of sugar. Think of these dried bits as natural and healthy candy!

Saturday, September 3, 2011

Green Beans Galore

The jade bush beans have played out, but the rattlesnake pole beans are producing prolifically, and the asian long beans are making more than we can eat!  It looks like it's time to put some up for future use. What will it be? Pickled dilly beans? Frozen string beans? Or something totally new, like canned green beans preserved in the pressure cooker?