I went into the hen house to collect eggs before leaving to go to Sunday dinner at Rouse's parents' house. There to greet me as soon as I opened the door was our friendly black snake. I'm sure he was looking for his next good meal. Instead, he got stuffed into a bag and relocated to the other side of town.
I hollared, "Black snake in the hen house!" (I've gotten quite good at hollaring that.) Rouse came running. By the time he got there, the snake had retreated under the nesting boxes and was climbing up the wall behind them. Rouse grabbed the snake by the tail and pulled him out into the yard. Andrew had run into the house to get a paper grocery bag. After a few attempts, Rouse got the snake stuffed into the bag.
We took the snake to Sunday dinner. Rouse's dad, Noah, entertained the crowd with his snake charming skills. He looked into the bag, reached in, and pulled the snake out head first. The snake was fairly calm. The only thing that gave away the stress he was under? He vomited up the entire egg he had eaten earlier!
Sunday, May 30, 2010
Odds and Ends
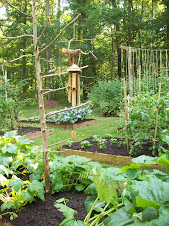
- I'm continuing to harvest beets. I put up two more pints of beet pickles this afternoon. We ate harvard beets for supper the other night. I love the taste of sweet and sour with beets!
- As the beets get somewhat thinned out I've been able to find space for a third row of okra down the middle of that bed. I got those seeds tucked in just in time for a little rain shower to soak them good on Friday evening. The other two rows of okra are holding their own. The plants have sprouted and grown up through the beets. They're a little spindly, but will become more robust as the weather heats up and the beets get out of the way.
- For some reason, all the butternut squash seeds planted in four of the five hills have sprouted and are growing well, but none of the seeds in the fifth hill sprouted at all. What? I planted more seeds in that space.
- The tomatoes are growing and have had to be tied up, up, up. The sun golds are just about to go over the top of their stakes. I'm worried that several of the tomato plants are looking a little strange, with leaves that look dry and shriveled on the edges. Time will tell what's going on there.
- All the beans are looking good, and the climbers are moving on up the string trellis.
- The eggplant is eaten up with flea beetles. I've replaced the Black Beauty eggplant that died.
- The brussel sprouts that my father-in-law gave me? Turns out they're broccoli plants.
- A second type of cabbage worm has shown up, the Diamondback Moth caterpillar ... all green, tapered at both ends.
- The potato plants are showing evidence of bug damage. I saw a couple of orange and black beetles. I don't know if they're causing the damage, but I promptly smooshed them.
Saturday, May 29, 2010
Yellow Summer Squash
Last year's squash crop was a total failure. I got the plants in the ground too late in the season. They were destroyed by squash bugs before fruit could set and mature. I was determined not to repeat that error. I took a chance and planted squash seeds in the garden on April 2. The gamble paid off. The plants have thrived, the harvest has begun.


Today, I picked the season's first straight-neck yellow squash. I sliced it and stewed it with onions. What a treat! Sweet, tender. Squash is such a hardy vegetable. It's hard to believe home-grown tastes significantly better than store-bought ... but it does.
Thursday, May 27, 2010
Magic Cobbler
This is my adaption of the traditional "One-Cup" fruit cobbler recipe. It's one of our favorite ways to enjoy black raspberries when they're in season!
Magic Cobbler
1 cup flour
3/4 cup sugar
3 teaspoons baking powder
dash salt
1/2 stick butter
3/4 cup milk
3 - 4 cups berries, sweetened with 1/4 - 1/2 cup sugar
Magic Cobbler
1 cup flour
3/4 cup sugar
3 teaspoons baking powder
dash salt
1/2 stick butter
3/4 cup milk
3 - 4 cups berries, sweetened with 1/4 - 1/2 cup sugar
- Preheat oven to 350 degrees.
- Mix flour, sugar, baking powder, and salt in a medium bowl.
- Melt butter in an 8" x 8" baking dish. When butter is melted, add milk to dry ingredients. Pour batter on top of butter. DO NOT STIR!
- Spoon fruit on top of batter.
- Bake ~ 45 minutes, until golden brown.
- Serve warm, topped with vanilla ice cream.
Wednesday, May 26, 2010
Busy Day in the Garden
 Dug some beets. Prepared roots for roasting and greens for sauteing in olive oil with onion and a splash of vinegar. We eat beet greens only when they're coming in from the garden. Grocery store beet greens rarely look good enough to eat.
Dug this season's first purple viking potatoes. Boiled them up for supper. Creamy, dreamy spuds!
- Cut down the sugar snap peas. Disappointing year.
- Trained more pole beans up the string trellis.
- Tied the tomatoes up another level.
- Checked the squash ... lots of baby veggies on the way.
- Picked black raspberries.

Monday, May 24, 2010
Great green globs of caterpillar poop!
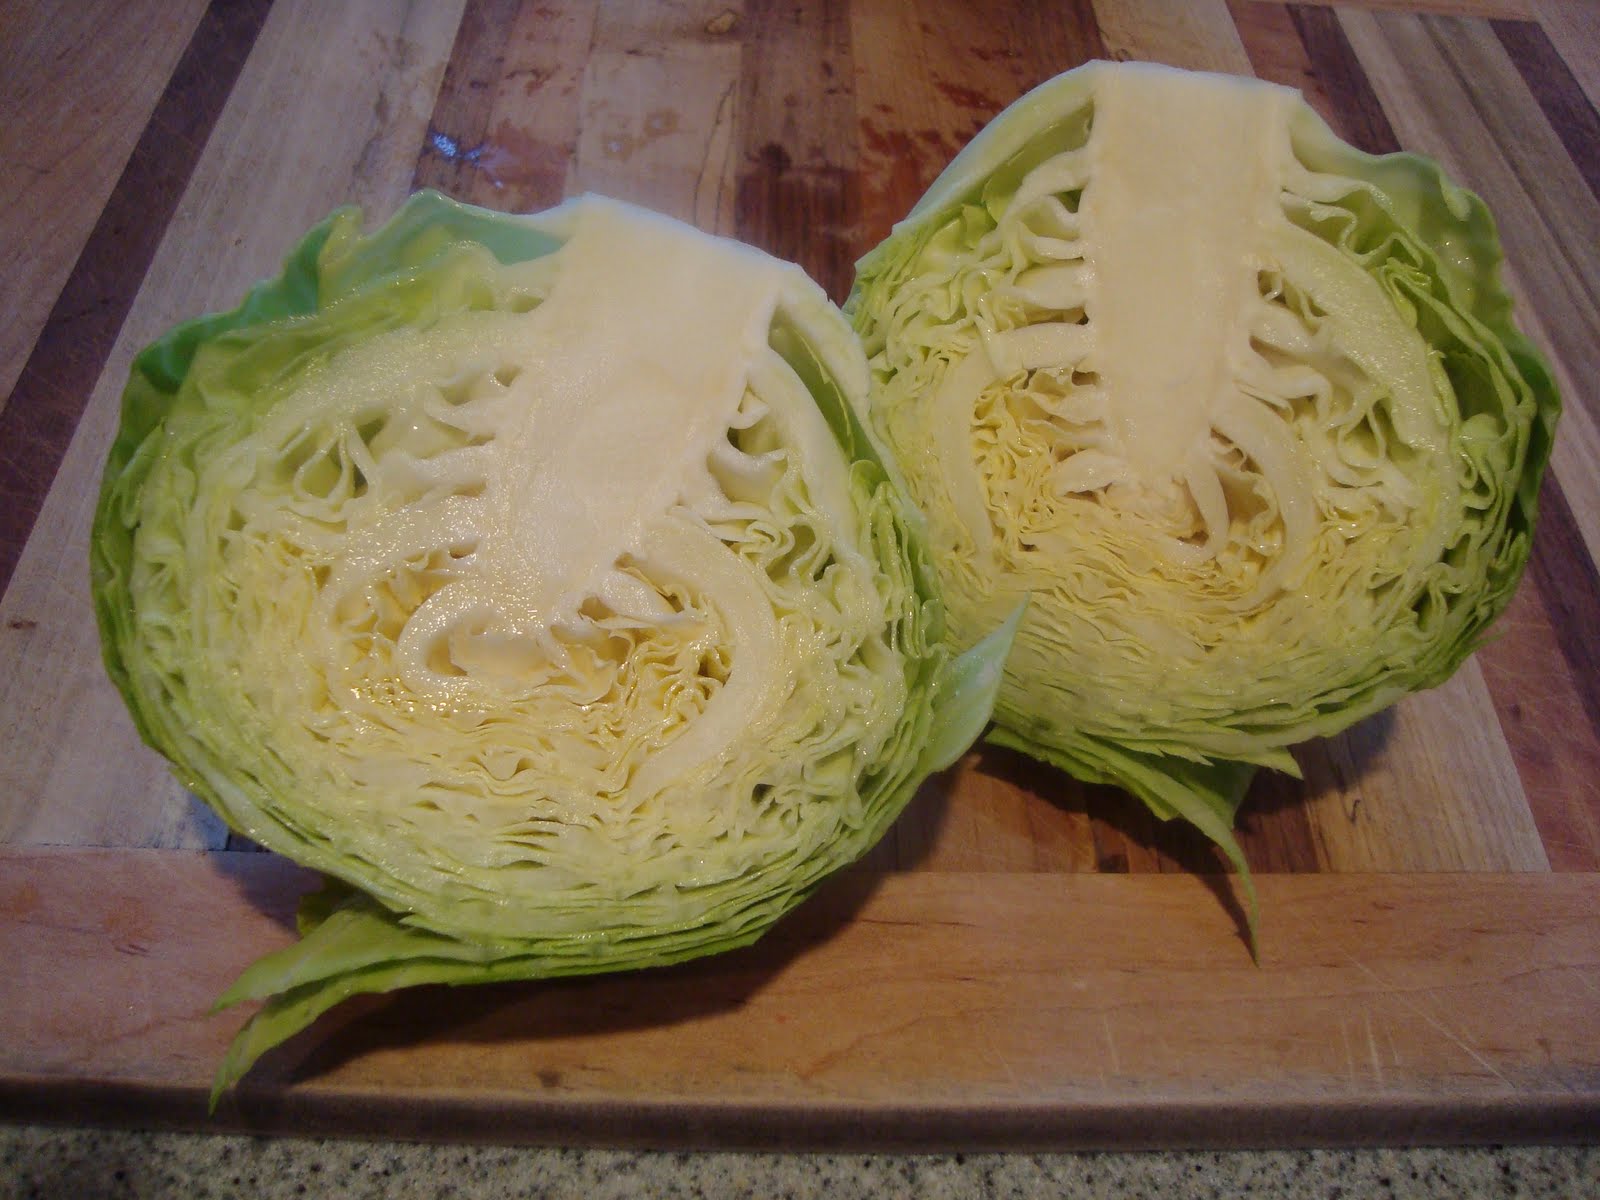
The cabbageworms are doing their best to take over the brassica vegetables. I would choose to dust them with bacillus thuringiensis, a "microbial insecticide" that is essentially nontoxic to people, pets and wildlife, but conditions are too wet. So it's me and my bare hands against the caterpillars. Let me tell you, their guts are as green as their poos.
I left no leaf unturned this morning in my search for interlopers, and I found many. While we were away from home this past weekend, the caterpillars had all but defoliated the brussel sprouts, seriously compromised a couple heads of cabbage, and made inroads into the broccoli. Thank goodness, few had found their way into the nice central broccoli stalks that I cut Saturday night. I wonder if it's too late to get out the cheap pantyhose to cover what's left of my cabbage heads?!
I left no leaf unturned this morning in my search for interlopers, and I found many. While we were away from home this past weekend, the caterpillars had all but defoliated the brussel sprouts, seriously compromised a couple heads of cabbage, and made inroads into the broccoli. Thank goodness, few had found their way into the nice central broccoli stalks that I cut Saturday night. I wonder if it's too late to get out the cheap pantyhose to cover what's left of my cabbage heads?!
Sunday, May 23, 2010
Pickled Beets

I have loved pickled beets since I was a kid. I remember eating them at my grandma's house, and I have a memory of her preparing fresh beets and canning her own beet pickles. I specifically recall the vivid red beet juice on her hands and the way the skin slipped so easily from the cooked vegetable, leaving a shiny, smooth globe. When I reminded her of this in her later years she said she didn't remember ever making her own pickled beets! One thing I know for sure (and my mother will confirm this) we always ate pickled beets as an accompaniment to macaroni and cheese. To this day, a serving of mac 'n' cheese is just not complete without sliced pickled beets on the side.
Too bad my grandma's recipe was lost in time. This one came from Ball's Blue Book of Preserving, today's bible of food preservation.
Beet Pickles
3 quarts beets (about 24 small)
2 cups sugar
2 sticks cinnamon
1 tablespoon whole allspice
1 1/2 teaspoons salt
3 1/2 cups vinegar
1 1/2 cups water
Wash beets; trim, leaving 2-inch stem and tap root; drain. Cook beets until tender; peel. Combine all incredients except beets in a large saucepan. Bring mixture to a boil; reduce heat. Simmer 15 minutes. Remove cinnamon sticks. Pack beets into hot jars, leaving 1/4-inch headspace. Ladle hot liquid over beets, leaving 1/4-inch headspace. Remove air bubbles. Adjust two-piece caps. Process 30 minutes in a boiling-water canner.
I cooked my beets on a baking sheet in the oven, loosely covered with foil, at 400 degrees. When fork tender, I peeled them, cut them into thick slices, and packed them into pint-sized jars. This recipe says it yields 6 pints. I dug 24 beet roots - didn't measure them in any other way - and got only two pint jars full! I guess my 24 beets had a lot less volume than the prescribed 24 "small" beets. I'll save the left-over prepared pickle juice for the next batch!
The Beach or The Broccoli?
You know you've got it bad when you choose to come home from the beach a day early because you're worried about the garden. Isn't that the way it seems to go? After the planning, the planting, the tilling, the toiling, the watering - the waiting, for goodness sake - the fruits of my labor mature and are ready to pick while I'm on vacation!
The broccoli absolutely had to be cut when we arrived home yesterday evening. Of course there was way more than we could eat this week. Plus, we had already eaten supper on the way home from the beach and had plans for Sunday dinner at Rouse's parents' house tonight. All that broccoli and no plan to cook in the immediate future ... I decided to capture all that fresh goodness and store it in the freezer for another day. As often happens, one great idea lead to another, and before long, we were on our way to Wal-Mart to purchase a vacuum packaging system. Rouse the Spouse was sweet to accompany me on this late night errand!
A vacuum sealing system is something I've been thinking about getting for awhile, especially for freezing my fresh garden produce. Exposure to air causes food to lose nutritional value and flavor, not to mention an increased chance of freezer burn. I've always used heavy-duty freezer bags, squeezing out as much air as possible. A vacuum packaging system, though, removes most of the air from the package reducing oxidation, sealing in flavor and quality, and extending the storage life of the food.
At 10:00pm we arrived home with the new toy. At this point, Rouse excused himself for bed, but of course I had to try it out immediately. I had frozen some local strawberries and packed them loosely into a big gallon-sized freezer bag. I re-packed those berries into two "FoodSaver" quart bags and sealed away. The packages look downright professional!
It was time to get that broccoli into the freezer. I had already soaked the broccoli heads in salt water for 30 minutes to remove any hidden insects or cabbageworms (a few did float out). I rinsed and drained the broccoli heads, then cut them into medium-sized sections. I blanched them for 3 minutes, cooled them in ice water, drained them, then laid them out on a tray and put them into the freezer while I cleaned up the kitchen. Once they were mostly frozen, the broccoli was easy to pack into three quart-sized "FoodSaver" bags. I let the machine do its thing, sucking the air out of the bag and sealing it up. Now they're stored in the basement freezer. Very satisfying. Here's to no power outages this year!
Saturday, May 22, 2010
The Garden is Going Crazy

- The tomatoes had to be tied up to another level.
- The pole beans are looking for a place to run. The plants on the upper side of the bed were climbing up the plastic fence that keeps chickens out of the garden. Rouse helped me make a string trellis.
- The center stalks of the broccoli plants must be cut NOW.
- There are enough beet roots ready to make beet pickles tomorrow.
- The squash plants have gotten huge, and baby zucchini and yellow squash fruits have formed.
- The okra plants have sprouted. I still need to plant one more row of okra.
- The black raspberries will start ripening in the coming week.
- I'll start looking for potatoes in the coming week, too.
- The sugar snaps look like they're pooping out ... they aren't producing much fruit anymore, but maybe that's because I haven't kept them picked for a few days.
Friday, May 21, 2010
Abi Surprised in the Chicken House
Abi called while I was walking on the beach this morning to report a little excitement. She was in Pittsboro to do lawn work at the house and at the office. While at the house she was checking on the chickens and picking up eggs. She reached into one of the nesting boxes to grab an egg and was surprised that someone (something) was already there. That's right! Our friendly neighborhood black racer was enjoying brunch at the Hen House Cafe. I bet Abi will look before she reaches next time!
Monday, May 17, 2010
Blessed Rain
I woke in the night to the sound of gentle rain falling. It was still raining when the alarm went off. Now, at midmorning, it's still wet and drippy. Just what we need - a good soaking! We were expecting Audubon tree surgeons to arrive this morning to fell several trees that are interfering with sunshine on the garden. Guess that will have to wait for another day.
Sunday, May 16, 2010
The Broccoli Harvest Begins
 We spent the weekend in Asheville, NC celebrating Andrew's 22nd birthday as well as his graduation from UNC-A. We arrived home on the heels of a little rain shower ... about 2/10ths of an inch. Everything looks clean and green. The garden looks lush. Rouse picked the sugar snaps and I cut this season's first stalk of broccoli.
We steamed the broccoli and ate it with some boiled new potatoes from the grocery store. It won't be long before we're digging our own new potatoes!
Friday, May 14, 2010
Hen Found Dead
The sick Barred Rock hen died this morning. We were expecting this, and would have dispatched with her ourselves, but ran out of time before heading away for the weekend. I had set her up in an old dog crate, plenty of space, clean straw, fresh water and feed. I'm relieved that nature took its course sooner rather than later.
Thursday, May 13, 2010
Beets and Peas, with Brocolli on the Way
'tis the season for good eating! Tonight we enjoyed roasted beets sliced and served simply with butter, salt, and pepper, along with beet greens steamed with onions that had been sauted in olive oil and a splash of balsamic vinegar. Very colorful alongside a serving of leftover grilled chicken.
The sugar snaps are coming in, but it takes a few days to save up enough to make a meal.
Expect brocolli on the menu next week!
The edemame has emerged.
The sugar snaps are coming in, but it takes a few days to save up enough to make a meal.
Expect brocolli on the menu next week!
The edemame has emerged.
Beautiful Butterflies Come From Very Hungry Caterpillars


Because of their voracious appetite, an "infestation" can be as few as two or three worms per plant! Their presence is unmistakable. The worms chew big holes in the leaves of their host plant. My cabbage and brussel sprouts are being most effected, but they enjoy the broccoli, too. The cabbage worms usually hang out on the undersides of leaves and produce dark green droppings that are fairly noticeable.
A serious infestation can result in the death of the plant, since increased leaf destruction means decreased photosynthesis. A minor infestation can make plants look ugly, but they're still edible. Just wash them carefully and inspect cabbage and broccoli for any worms that have made their way to the interior of the heads. A good salt water soak should bring out any hidden worms. So what to do in the garden?
To prevent infestation in the first place, plants may be protected with floating row covers, especially in spring and early summer, when egg-laying activity is at its highest. I obviously missed my opportunity to do this.
Check plants frequently for worms, especially if the butterflies have been seen nearby. Hand-pick and destroy any worms found. That's been my line of defense. My method of destruction? Smoosh them between my fingers! Bug guts are nothing when it comes to protecting my garden. Here's an interesting tip: To prevent the worms from burrowing into cabbage heads, insert each head into a nylon stocking, and leave it on until you harvest the head. I haven't tried that yet, but I may!
If there's a serious infestation, purchase bacillus thuringiensis (BT) from the garden center and apply it according to the directions. This is an organic treatment. Vegetables may be picked and consumed anytime after spraying, and pets and family may return to the treated area immediately after spray deposits are dry. Caterpillars must eat a small amount of treated leaf to get a lethal dose. Caterpillars stop feeding within a few hours after taking a bite of the treated leaf and death follows within a few days. See http://organicgardening.about.com/od/pestcontrol/p/cabbageworms.htm for more information about BT.
Wednesday, May 12, 2010
Egg Yolk Peritonitis
Poor chicken is looking worse! Earlier today I picked her up and palpated the area below the vent. She has swelling and fluid pooling in her abdomen. Her poos are watery and yellowish. Her wings are droopy, and she's showing a preference for sitting rather than standing. In fact, she fell over when I placed her back in the crate. What to do?
I've been searching the internet for a possible diagnosis. I think I've finally hit upon it .... egg yolk peritonitis. Egg yolk peritonitis is a condition related to egg production that may be fatal to the bird. It is caused by yolk fluid leaking from the oviduct and ovaries into the abdominal cavity. The fluid builds up there, causing a visible swelling of the abdomen. Droppings will range from normal, to yellowish and diarrhea. Antibiotics will not help this problem, but if the peritonitis remains sterile, the hen may last this way for years. If the chicken is miserable, has stopped eating and is obviously quite sick the most humane thing would be to put her down. I'm afraid that's what it's come to with my chicken.
Hens with sterile egg yolk peritontis will continue to eat and get around, although they will not lay anymore. If the hen has sterile EYP, not treating the bird at all is an option, or the fluid may be drained off by an avian vet. Hens with sterile EYP should be treated immediately if they get a respiratory infection or an infection of the intestines, as the bacteria from the airsacs and intestines can "leak" into the abdomen, causing septic EYP which is fatal. Sometimes an egg will get stuck or even break in the oviduct and the resulting infection from that will cause EYP. This type of EYP usually turns septic and is fatal.
A helpful website: http://www.thepoultrysite.com/
An article about Non-infectious Diseases of Poultry: http://www.nt.gov.au/d/Content/File/p/Anim_Dis/667.pdf
Tuesday, May 11, 2010
Sick Chicken Update
I checked on the quarantined chicken. She had knocked over her water container. I filled that up and gave her the opportunity to drink while I tended to other chores in the garden. I came back to give her a good look. At first, I thought she might be feeling better. Her eyes seemed a little brighter, although her behavior still appeared depressed.
She had not laid an egg since being contained. Actually, I can't be sure this chicken has ever successfully laid an egg. The last time she was sick she had a soft-shelled egg hanging from her rear end. I haven't had a full nest of eggs yet this season. Seems as if someone's not doing her job!
There was one little splotch of poo in her cage... yellowish, liquid. I thought I'd inspect her bottom to see what I could see. When I picked her up a stream of liquid flowed out of her mouth. Could be nothing... I read that water coming out of a chicken's crop is typical if they recently drank and you tip them over. I failed to note whether or not she actually took a drink after I filled the water container. Duh!
Here's a good chart that shows poultry diseases with causes, symptoms, and methods of prevention and treatment: http://www.welphatchery.com/poultry_health.asp
The End of Spring
Signs of the end of spring:
- The lettuce went bitter over the weekend.
- The radishes are bolting and have become pithy.
Monday, May 10, 2010
Sick Chicken - This, too, shall pass?
The same chicken is sick again. She's lethargic, has weak eyes, and a ball of hardened poop about the size of a golf ball stuck to the feathers of her rear-end. Not a happy chicken! I cleaned her up best I could with a wash cloth and warm water. I couldn't avoid removing some feathers from below the vent... the poo was as hard as conrete! Upon inspection, though, the vent area didn't look inflamed and there was no discharge. No discharge from her eyes, either. Her breathing seems normal. I hope she's simply constipated, but I separated her from the rest of the flock as a precaution.
Peppers, Butternut Squash, and Baby Broccoli
I said that I was giving up on peppers, but I just couldn't resist trying a few varieties! No bell peppers this year, though. I've had no good luck with them in the past. I've been told that hot peppers do better around here. I'm trying one plant each of the following varieties:
My broccoli is heading up. We're experiencing very dry conditions, so I'm keeping the broccoli watered. My mouth is watering in anticipation!
- Cubano - sweet
- Cow Horn - pungent
- Yellow Banana - mildly hot
- Jalapeno - hot
My broccoli is heading up. We're experiencing very dry conditions, so I'm keeping the broccoli watered. My mouth is watering in anticipation!
Sunday, May 9, 2010
Herbs for Mothers' Day
A Mom ... tends her garden
of young growing flowers
through long sunny days
and a few teary hours ...
She knows in her heart
just what every plant needs,
how to grow a bright dream
from the smallest of seeds ...
Life's garden is blessed
by a Mom's loving touch,
and that's why we cherish
her warm ways so much.
~Jessica St. James
Noah and Andrew gave me a selection of herbs to add to the herb garden. I planted them this afternoon upon our return from a weekend in Asheville.
Thai Basil - an annual. With its pronounced anise-licorice aroma and flavor, Thai basil is excellent with green curries and stir-fry dishes. While the seeds of this variety of basil (referred to as subja in India) have no distinct flavor, they swell and become gelatinous in water and are used in Indian and Asian sweets, drinks and as an appetite suppressant.
Like all basil, this variety likes full sun in well-drained soil that contains well-rotted manure or good compost. Unlike other herbs it can't tolerate drought. Once flourishing, cut every stem of the herb back to the second set of leaves and don't allow it to flower. This will encourage an ongoing supply of basil all summer long.
Dill - a hardy annual of the parsley family. Use of the dill plant varies with the season... leaves in early spring, seeds in the fall. With its simple, clean taste, fresh dill is a natural paired with fish, mild cheeses (cottage cheese), egg dishes (deviled eggs, egg salad), vegetable dishes (beets, cauliflouer, green beans), and potatoes. Dill complements sauces made with cream, sour cream, or yogurt. Cucumbers partner well with dill, either in salads, chilled soups or on tea sandwiches. Dill has been used in pickling for centuries. Use dill sparingly, as the flavor grows.
Dill will grow in most soils but requires a sunny location. It is drought resistant, sprouts easily and will self-seed. An erect umbelliferous plant, dill grows to 3 ft tall. The leaves are feathery and fernlike. Yellow flower umbrels top the plant in mid-summer. Dill is a helpful plant to have in the garden since it attracts beneficial insects whose larvae feed on aphids. To harvest dill, just snip what you need with a scissors, leaving the rest of the plant to keep growing.
Sorrell - a perennial. The name sorrel is derived from the Germanic word sur, and the old French word surele, both meaning sour. It is an ancient herb used by Egyptians and Europeans to impart acidity to foods. Today, it is a popular flavoring for whitefish, soups, and salads in French cooking. The fresh leaf and flower are high in vitamin C, potassium, phosphorus, calcium, and magnesium.
Cut the stalks back when they begin to bolt in July. The plant will then put out new growth, providing tender leaves all summer long. Plants may be divided in either spring or autumn. Space plants about a foot apart on all sides.
Lemon Balm - a perennial. With of its delicate lemon scent and flavor, lemon balm has wide culinary appeal. Whole fresh leaves may be used as an attractive garnish. Chopped fresh leaves may be used to add zest to sweet or tangy dishes. Lemon balm combines well with allspice, bay leaves, chervil, mint, pepper, rosemary and thyme. A wonderful addition to fruit salads, green salads, herb butters, fruit drinks, and sorbets, it may also be used in egg dishes, custards, soups and casseroles. It works well in stuffings for poultry, lamb or pork and in marinades / sauces for fish. Lemon Balm is the basis of the cordial eau des Carmes and is also found in Benedictine and Chartreuse.
Lemon balm prefers rich moist soil and partial shade. It can tolerate direct sunlight but plants grown in shade tend to be larger and more succulent. It is related to mint in appearance, but it is not as invasive and easier to control. A clump-forming herbaceous perennial, it grows up to 1-2 feet high. Bluish-white or yellow flowers grow from the axils of the leaves and bloom from May to October. After pollination, long oval brown seeds appear. The leaves should be harvested before the flowering for optimum flavour and fragrance. The plant should be cut back in the fall.
Sweet Marjaram - a perennial in the mint family. For several reasons, there is a great deal of confusion in distinguishing marjoram from oregano. For one thing, they have the same genus, Origanum, while the species differ. For another thing, people call them by each other’s names:
Marjoram is sweeter and milder than oregano. Marjoram is typically used in European cooking and is added to fish sauces, clam chowder, butter-based sauces, salads, tomato-based sauces, vinegar, mushroom sauces, and eggplant. The French add marjoram to bouquet garni and herbes fines for flavoring pork, fish, and lamb dishes. In Germany, marjoram is called the “sausage herb” and is used with thyme and other spices in different types of sausages. It is usually added at the end of cooking to retain its delicate flavor or as a garnish. It goes well with vegetables including cabbages, potatoes, and beans. The seeds are used to flavor confectionary and meat products.
Marjoram prefers well-drained soil, full sun, and room to spread. Cut the plant back if it becomes woody, and it will re-grow. It can be used fresh or dried.
A nice resource for all things herbal - http://www.theepicentre.com/index.html
of young growing flowers
through long sunny days
and a few teary hours ...
She knows in her heart
just what every plant needs,
how to grow a bright dream
from the smallest of seeds ...
Life's garden is blessed
by a Mom's loving touch,
and that's why we cherish
her warm ways so much.
~Jessica St. James
Noah and Andrew gave me a selection of herbs to add to the herb garden. I planted them this afternoon upon our return from a weekend in Asheville.
Thai Basil - an annual. With its pronounced anise-licorice aroma and flavor, Thai basil is excellent with green curries and stir-fry dishes. While the seeds of this variety of basil (referred to as subja in India) have no distinct flavor, they swell and become gelatinous in water and are used in Indian and Asian sweets, drinks and as an appetite suppressant.
Like all basil, this variety likes full sun in well-drained soil that contains well-rotted manure or good compost. Unlike other herbs it can't tolerate drought. Once flourishing, cut every stem of the herb back to the second set of leaves and don't allow it to flower. This will encourage an ongoing supply of basil all summer long.
Dill - a hardy annual of the parsley family. Use of the dill plant varies with the season... leaves in early spring, seeds in the fall. With its simple, clean taste, fresh dill is a natural paired with fish, mild cheeses (cottage cheese), egg dishes (deviled eggs, egg salad), vegetable dishes (beets, cauliflouer, green beans), and potatoes. Dill complements sauces made with cream, sour cream, or yogurt. Cucumbers partner well with dill, either in salads, chilled soups or on tea sandwiches. Dill has been used in pickling for centuries. Use dill sparingly, as the flavor grows.
Dill will grow in most soils but requires a sunny location. It is drought resistant, sprouts easily and will self-seed. An erect umbelliferous plant, dill grows to 3 ft tall. The leaves are feathery and fernlike. Yellow flower umbrels top the plant in mid-summer. Dill is a helpful plant to have in the garden since it attracts beneficial insects whose larvae feed on aphids. To harvest dill, just snip what you need with a scissors, leaving the rest of the plant to keep growing.
Sorrell - a perennial. The name sorrel is derived from the Germanic word sur, and the old French word surele, both meaning sour. It is an ancient herb used by Egyptians and Europeans to impart acidity to foods. Today, it is a popular flavoring for whitefish, soups, and salads in French cooking. The fresh leaf and flower are high in vitamin C, potassium, phosphorus, calcium, and magnesium.
Cut the stalks back when they begin to bolt in July. The plant will then put out new growth, providing tender leaves all summer long. Plants may be divided in either spring or autumn. Space plants about a foot apart on all sides.
Lemon Balm - a perennial. With of its delicate lemon scent and flavor, lemon balm has wide culinary appeal. Whole fresh leaves may be used as an attractive garnish. Chopped fresh leaves may be used to add zest to sweet or tangy dishes. Lemon balm combines well with allspice, bay leaves, chervil, mint, pepper, rosemary and thyme. A wonderful addition to fruit salads, green salads, herb butters, fruit drinks, and sorbets, it may also be used in egg dishes, custards, soups and casseroles. It works well in stuffings for poultry, lamb or pork and in marinades / sauces for fish. Lemon Balm is the basis of the cordial eau des Carmes and is also found in Benedictine and Chartreuse.
Lemon balm prefers rich moist soil and partial shade. It can tolerate direct sunlight but plants grown in shade tend to be larger and more succulent. It is related to mint in appearance, but it is not as invasive and easier to control. A clump-forming herbaceous perennial, it grows up to 1-2 feet high. Bluish-white or yellow flowers grow from the axils of the leaves and bloom from May to October. After pollination, long oval brown seeds appear. The leaves should be harvested before the flowering for optimum flavour and fragrance. The plant should be cut back in the fall.
Sweet Marjaram - a perennial in the mint family. For several reasons, there is a great deal of confusion in distinguishing marjoram from oregano. For one thing, they have the same genus, Origanum, while the species differ. For another thing, people call them by each other’s names:
- Greek oregano, O. vulgare, is called not only wild marjoram, but also Spanish thyme.
- Cretan oregano, O. onites, is also called pot marjoram or French marjoram.
- Marjoram, O. marjorana, is also called pot marjoram.
- O. heracleoticum is sometimes known as winter marjoram.
Marjoram is sweeter and milder than oregano. Marjoram is typically used in European cooking and is added to fish sauces, clam chowder, butter-based sauces, salads, tomato-based sauces, vinegar, mushroom sauces, and eggplant. The French add marjoram to bouquet garni and herbes fines for flavoring pork, fish, and lamb dishes. In Germany, marjoram is called the “sausage herb” and is used with thyme and other spices in different types of sausages. It is usually added at the end of cooking to retain its delicate flavor or as a garnish. It goes well with vegetables including cabbages, potatoes, and beans. The seeds are used to flavor confectionary and meat products.
Marjoram prefers well-drained soil, full sun, and room to spread. Cut the plant back if it becomes woody, and it will re-grow. It can be used fresh or dried.
A nice resource for all things herbal - http://www.theepicentre.com/index.html
Thursday, May 6, 2010
Planting the Hot Weather Crops
May 1st has come and gone and soil temperatures are on the rise. Time to get those heat-loving crops in the ground.
I planted two 12-foot rows of Clemson Spineless Okra in between the rows of beets. I've read that in raised beds one may use a "matrix" spacing allowing six to eight inches between the plants in each direction. If that's the case, I have room for one more row down the middle of the bed. I'll tackle that another day.
If all goes as expected, about the time the beets are finishing up the okra will have sprouted and will be ready to take off. I followed this plan last year and it worked beautifully. Last year, I planted the okra seeds while the beet greens were still small and learned that the okra didn't do much of anything until the weather got really hot. Okra plants prefer warm temperatures and grow quickly so there’s really no rush to plant them. So this year I waited longer to plant the okra, which made it more difficult to work around the larger beet greens! Oh, the pros and cons of it all...
Okra is well suited to the long, hot growing season we experience here in the piedmont of North Carolina. Each plant will produce numerous pods from July to October. Production is encouraged by keeping the pods picked. That presents no problem for this family. We're all looking forward to okra all ways ... steamed, stewed, sauted, fried, grilled ... even pickled! Okra pickles are the best accompaniment to a plate full of deviled eggs.
Okra is in the same family as hollyhocks and hibiscus. In addition to a delicious and prolific vegetable crop, okra produces beautiful flowers!
Eggplants also do not like to be cold and will suffer from failure-to-thrive syndrome when conditions are not to their liking. I hope days will be consistently sunny enough for the eggplant. Today I purchased eggplant starts at the Lowes Home Improvement garden center. They didn't have many plants available, but I didn't need many so that was OK. I bought two plants each of the Japanese Ichibon and Black Beauty.
I haven't had much luck with eggplant in the past, but I do love eating it, so I wanted to try again. I went on-line and read up on growing eggplant. Here are some tips that I learned:
The interesting thing about edamame is it has an optimum harvest period of just a few days. All the pods tend to develop at the same time. If I can manage the space, I may do successive plantings every couple of weeks to spread out the edamame joy.
I planted two 12-foot rows of Clemson Spineless Okra in between the rows of beets. I've read that in raised beds one may use a "matrix" spacing allowing six to eight inches between the plants in each direction. If that's the case, I have room for one more row down the middle of the bed. I'll tackle that another day.
If all goes as expected, about the time the beets are finishing up the okra will have sprouted and will be ready to take off. I followed this plan last year and it worked beautifully. Last year, I planted the okra seeds while the beet greens were still small and learned that the okra didn't do much of anything until the weather got really hot. Okra plants prefer warm temperatures and grow quickly so there’s really no rush to plant them. So this year I waited longer to plant the okra, which made it more difficult to work around the larger beet greens! Oh, the pros and cons of it all...
Okra is well suited to the long, hot growing season we experience here in the piedmont of North Carolina. Each plant will produce numerous pods from July to October. Production is encouraged by keeping the pods picked. That presents no problem for this family. We're all looking forward to okra all ways ... steamed, stewed, sauted, fried, grilled ... even pickled! Okra pickles are the best accompaniment to a plate full of deviled eggs.
Okra is in the same family as hollyhocks and hibiscus. In addition to a delicious and prolific vegetable crop, okra produces beautiful flowers!
Eggplants also do not like to be cold and will suffer from failure-to-thrive syndrome when conditions are not to their liking. I hope days will be consistently sunny enough for the eggplant. Today I purchased eggplant starts at the Lowes Home Improvement garden center. They didn't have many plants available, but I didn't need many so that was OK. I bought two plants each of the Japanese Ichibon and Black Beauty.
I haven't had much luck with eggplant in the past, but I do love eating it, so I wanted to try again. I went on-line and read up on growing eggplant. Here are some tips that I learned:
- Eggplants are very susceptible to flea beetles, which make pin holes in the leaves and can cause considerable damage. - This I know from experience. I picked the flea beetles off by hand last year. Other methods of dealing with the critters is to cover the plants with gardening fabric early in the season to prevent the first infestation of the bugs. Once they're on the plants, treat with insecticidal soap. Most healthy plants will recover from the leaf damage.
- Eggplants do not like standing water, so mature plants should be watered deeply and infrequently. But do not allow the leaves to wilt during the day. If water is adequate, and wilting still occurs, check for root knot nematode damage by digging into a section of side roots and looking for the nematode knots in the roots. The best defense against root knot nematode damage is a healthy root system.
- Feed eggplants once or twice during the growing season with a light application of fish emulsion or compost/manure tea. This helps to supply potassium, which the plants need to keep producing fruit.
- As the eggplants grow and bear fruit, they will need support. I put tomato cages in place to give my eggplants something to lean on.
- Pick eggplants when they are bright and shiny. Dull-skinned fruits have begun to form mature seeds and tough skin. In very warm climates, eggplants may not reach full size before loosing their shine. Don’t hesitate to harvest them when they are small in order to enjoy firm, mild, seedless flesh.
The interesting thing about edamame is it has an optimum harvest period of just a few days. All the pods tend to develop at the same time. If I can manage the space, I may do successive plantings every couple of weeks to spread out the edamame joy.
Tuesday, May 4, 2010
Snake in the Hen House!


He was so busy devouring that egg, he couldn't put up much of a fight. I don't know how many eggs he had already eaten, but only five remained in the nesting boxes. Last Tuesday I collected only 4 eggs. I'm sure the balance of that day's eggs went to our serpentine visitor, as well.


After that, I folded the top of the bag down twice - creasing it smartly - then clamped it in the middle. I thought I'd wait for Rouse to get home before relocating the snake to some far off woodsy environment. Imagine my surprise when I went outside to show off my catch, only to find the bag misshapen and empty!
The egg thief is at large. Now I have to catch him again!
Sunday, May 2, 2010
Subscribe to:
Posts (Atom)